Showing posts with label good eats. Show all posts

Tuesday, July 8, 2014

Perfect Summer Salad

There was a time when my girl friends and I would get together and try and have conversations while chasing our toddlers. We all said "this will be so much easier when they are older". Um what were we thinking!?! Between the worst winter and all of our children's different sports teams we have not seen each other in forever. Honestly I would pay good money to run after a wee-one if it meant I could have a chat with my friends in person more other. We really didn't know how good we had it!

So when a friend sent out a text saying lets have a little happy hour before the 4th, we were all in! All we had to do was bring something to share and something to sip. So simple yet so perfect. I will admit that I just brought some cupcakes, nothing worth blogging about. But Former Blogger A brought a salad that was so good I asked for the recipe. Being the wonderful friend that she is she said I could past the recipe along to you!


Asparagus, Tomato & Cumber Salad (from Prevention Magazine)

8 ounces asparagus, trimmed and roughly chopped into bit sized pieces
2 cups sliced english cucumbers
1 large tomato, halved and thinly sliced
1/2 large red onion, thinly sliced
3 ounces feta cheese, crumbled
1/4 cup balsamic vinegar
1 tablespoon chopped fresh basil
2 teaspoons olive oil
1 teaspoon dijon mustard
1/2 teaspoon ground black pepper

Place the asparagus in a pot with a steam basket. Steam for about 5 minutes, or until crisp-tender. Immediately plunge the asparagus into a bowl of cold water, drain, and lightly pat dry.

Place in a large bowl. Stir in the cucumbers, tomatoes, onions, and feta.

In a small bowl, whisk together the vinegar, oregano, oil, mustard, and pepper. Pour the vinaigrette over the vegetables and toss well.

Trust me, you need to try this salad!

Wednesday, May 14, 2014

Sports Night Dinner

Weeknight dinners have been trying this Spring to say the least! Three kiddos and four sports teams means that I have to make sure everyone gets the right field at the right time with the right equipment. (I might have been overheard saying "you should never leave home without your mouth-guard" more than once.) I am happy to report that I have yet to drop a child off at the wrong field but making a wonderful dinner every night has been hard.

Yes Hubby grills when his schedule allows. Of course I use my crock-pot a ton. But the dinner meals that I have become my new "go-to" are sandwiches. With a little bit of planning everything can be prepared ahead of time and then once we get home from the fields all I have to do is assemble the sandwiches.


Our new favorite sandwich is mini meatball subs. I made the meatballs ahead of time (basically just balled sausage since they have to be egg and gluten-free) and add them to tomato sauce. Then when we got home I reheated the meatballs and sauce. Place them on mini-Italian rolls for the boys and a gluten-free roll for B. Topped all of them with fresh mozzarella cheese and placed under the boiler until the cheese started to melt. A little fresh basil and we were all set. 

So easy and so much better than chicken nuggets if you ask me! Do you have any "dinner" sandwiches that I should try?

Monday, May 12, 2014

Mother's Day 2014

After a ton of rain last week we were finally blessed with a beautiful day filled with sunshine for Mother's Day. And boy did we make the most of the sun!


Hubby and the kiddos came with me to pick out flowers for my new flowerpots. While we were looking for colorful blooms the kids really got excited by all of the potted fruit and veggie plants and some how I was talked into buying a pepper plant, watermelon vine and cilantro herb. All three kiddos promised to water and care for these plants but I am not sure how long they will last.


After all of the flowers were potted and watered, Hubby and I scrubbed all of the deck furniture. (I still can't believe that weather has been so rainy that we have not had a single family meal on the deck this year. Hopefully now that everything is cleaned and ready to go we will be able to dine al fesco next weekend.) After we were done scrubbing Hubby thought it was the perfect time turn the hose on L. Good thing L has a wonderful sense of humor because I don't think I would have been giggling as much as L did if the hose was turned on me! (Hubby's note- For the record he was already soaked from the water balloon fight/running through the sprinkler/water gun fight/spraying each other with the hose/general anarchy the neighborhood boys were all doing.)


After all of our hard work Hubby cooked dinner for all of us. I always think not having to cook dinner is a wonderful treat. And after our yummy dinner B gave me a real sweet treat. She baked me a carrot cake from scratch. I was so proud of her!  I know this will sound cheesy but it really was the icing on such a wonderful day with my family!!!

Thursday, May 8, 2014

Welcome Home Meal

As you may already know, B had a field hockey tournament last weekend up in Pennsylvania. B and her teammates played well and more importantly they had a wonderful time. It might be just me that feels this way but win or lose the rides home from tournaments are soo long! The excitement is over and B always falls asleep on me. So I always enjoy driving into town and knowing we are home.


Coming home on Saturday was made even better by the scene B and I walked in on. Hubby and M were fast at work on some homemade biscuits. After a quick hug, L informed me that we were having ham and biscuits for dinner. I might be a Northern girl but I must have a little Southern heart because I was just over the moon!

Hubby and the boys followed Southern Living's recipe "Our Favorite Buttermilk Biscuit" from their May 2014 addition. These biscuits were tender and flaky. Plus the butter tang was spot on! While these biscuits would have been perfect by themselves, my boys took it to a whole other level.

Hubby cooked a country ham steak on a casket iron skillet. While the ham was cooking he sliced the biscuits then he spread djion mustard on them. He also sliced some extra sharp cheddar cheese. When the ham was nice and hot he pulled it off the pan and sliced it into bite sized pieces. Finally he added a slice of ham and cheese to each biscuit. Simply put... it was heaven on a biscuit!!!


And if you didn't think I was already too spoiled I should let you know that Hubby DVR'ed the Derby for me. Please don't tell me that I was the only one that loved Johnny Weir and Tara Lipinski!?!

Wednesday, April 30, 2014

Spring Risotto

There is just something about ham that says "Spring" to me. Just thinking abut roasting a spiral ham makes me hungry but these days I just don't have time to spend a whole day in the kitchen. Three kiddos on four different sports team really has forced me to cook more quick meals. But quick does not have to mean tasteless food.

So if you and in the mood for a yummy ham dinner but have little time give this recipe a try. I promise you will love it!!!


Risotto with Peas and Prosciutto

1 tablespoon olive oil
1 small onion, chopped
1 cup Arborio rice (short gain)
4 to 6 cups hot chicken broth*
1 cup frozen or fresh green peas
1/2 cup roughly chopped prosciutto

Heat chicken broth to a gentle boil in a small pan. 

In another pan (medium sized) saute the chopped onion in olive oil over medium heat, until the onion is softened.

Add rice and saute for about 2 minutes until all the grains are coated.

Add hot broth, 1 cup at a time, stirring after each addition until the broth is adsorbed; about 20 to 25 minutes. The risotto should be creamy; add more liquid if a creamier texture is desired.

Stir in the peas and prosciutto until the peas are heated all the way. Serve immediately and enjoy!

*If you or someone you are cooking for is on a gluten-free diet be careful which chicken broth you use. I know that it is hard to believe but some chicken broths have gluten added to them. Weird, right!?!*

Tuesday, April 8, 2014

Peppered Steaks

Hubby says many sweet and kind things to me. One of the sweetest things that he says to me from time to time is, "I feel like cooking dinner tonight." I mean really what wife would not love to hear that!?! Recently, Hubby said just that and then hopped online to find a different way to prepare steak other than grilling. His finding were so good that I just had to share them with you!


Pepper Crusted Steak
4 Sirloin steaksKosher salt3 Tablespoons freshly ground black pepper, coarseOlive oil, enough to coat the bottom of your cast-iron skillet
Pre-heat the oven to 500°F. 
Sprinkle the steaks with salt on both sides, and then press the ground peppercorns into the steaks on both sides. 
Set a large cast-iron skillet over medium-high heat and add just enough olive oil to make a light film. When the oil is very hot, add the steaks, cooking until nicely browned on one side, about 3 minutes. Flip the meat over and put the skillet in the oven. 
For medium-rare steaks, roast for 3 minutes for 6-oz. steaks; 4 minutes for 8-oz. steaks*. Check for doneness with the tip of a knife or by pressing with your fingertips, keeping in mind that the steaks will cook a bit more as they sit**. Transfer the steaks to a warm plate and tent with foil.
*Hubby left the steaks in the oven for about 5 minutes. 
**Hubby used a meat thermometer to make sure that the steak had reached 145 degrees. (Hubby's note- I was pretty happy with the results overall since I have never made steak any way other than on the grill before. I will especially keep this in mind next winter when it is too cold outside to grill.)

The pepper added a bit of kick but nothing too bad, unless you are B who I think would complain about milk being spicy. Add some rice and a salad (and maybe a gin and tonic) to round out this great dinner. Definitely something to keep in mind next time we have company!

Wednesday, April 2, 2014

Unicorn Salt

I love green beans! I could eat them every night of the week. You can steam them, add them to a casserole or even eat them raw with a yummy dip. The possibilities are endless if you ask me. Alas, the four other members of my family do not feel the same way. No matter how I served them no one enjoyed them.


All of that changed when B and I stumbled upon a salt tasting at a local gourmet shop. I for one had never heard of a salt tasting but since I am a "salty over sweet" kind of a gal I was all for it. B and I both enjoyed some of the flavored salts from a company called Beautiful Briny Sea. B decided that we had to buy their Magic Unicorn Salt. 


The salt has a great smoky flavor. Since Beautiful Briny Sea stated that one should use it on anything because "it's magic" I thought I would try in on green beans. I simply added some of the salt to some green beans that I had sauteed.


And what do you know....they all loved the green beans! Truly it was a veggie miracle!!!

Monday, March 17, 2014

How To Have A Perfect St Patrick's Day

For me, St Patrick's Day will always be a day for family. This year will really be all about family since the kiddos are home for their 14th snow day. After some sledding and hot cocoa, I plan to make sure that we have a wonderful St Pat's Day!


First off, the kiddos and I plan to bake some Irish Soda Bread. The best part about this recipe is that it makes two loafs. One for you and your family plus another to share!


While our bread is baking, I will turn on our stove-top for our corned beef dinner. This is one of my most favorite one-pot dinners. And it is all the better as leftovers between two pieces of rye bread.


And if I am a very lucky gal, Hubby will pour me a glass of Guinness at the end of the day. Slainte my friends!

Tuesday, March 11, 2014

You Will Thank Me Later

As your friend I feel that I have to tell you that you should stop what you are doing and figure out how you are going to get your hands on Cadbury's White Mini Eggs! I know what you are saying; "Eileen, I already know what a Cadbury Mini Egg is. No big deal." And some of you are also saying; "Ummm, Eileen, we are in the middle of Lent. Why in the world would you be talking about sweets!?!"

So first off, Cadbury is not just making their tradition solid milk chocolate. They are making Easter tasty this year with three mini eggs; milk chocolate, white chocolate and dark chocolate. And for any of you out there with food "issues" like we do, you will be happy to know that Cadbury clearly lists all ingredients in their chocolate products. It is so nice to simply red a label and know if your child can safely eat it! All three of the kiddos declared that the White Mini Eggs are their favorite of the new line-up.


My second reason for telling you all about this yummy candy is because I have developed a sweet tooth. Normally I would take something salty over something sweet. My main go to is cheese and crackers but this year I have given up cheese for Lent. Sounds easy right!?! Wrong, now my without my go-to afternoon snack I am turning to this yummy candied eggs for a bit of energy. I have sub sugar for salt and that is not a good thing. So not what Lent is all about! 


So after you have finished judging me, run to the stores and pick up a bag or two. They might not look like they are that special but these new Mini Eggs are awesome. Trust me you will thank me later!!!

Wednesday, March 5, 2014

Fat Tuesday

I am well aware that for tons of Americans Fat Tuesday means pancakes for dinner. Growing up that's what my mother always served my and my three brothers. And for many years I have served the very same thing. But this year the kiddos asked to try something different.... 


Hamburgers and fries! So we all headed out to one of our favorite burger joints, Market Burger. Market Burger uses local sourcing for all of their burgers which ensures nothing but the freshest of foods. Very farm to table approach to a traditional burger joint. The end result is a super yummy burger!

The best part about Market Burger is that my whole family can enjoy their fries. If your family is anything like mine, then you would know that restaurant fries are a big no-no. At most places we have to worry about cross-contamination. But happily Market Burger only fries fresh cut potatoes and they don't use peanut oil. Perfect if you ask me!


A yummy meal that was not that healthy yet allergy friendly. So happy that kiddos talk me into something different this Fat Tuesday!!!

Thursday, February 27, 2014

Snickerdoodle Candy

I am not sure if it is all the cold this weather or what but we have really been on a "snickerdoodle" kick lately. First we made snickerdoodle bread and this week we tried a snickerdoodle candy recipe. L had wanted to try snickerdoodle cookies but all of the recipes that I found called for eggs and L is allergic. And when I googled egg-free snickerdoodles I came upon a candy recipe. 


All I could think while L and I were making the truffles together was that even if the recipe was a bust the look on his face was so worth the effort. Sometimes I think B & L just like it when I try to make something they have seen their friends eat but they can't due to food issues. Even if our attempt does not work, at least we can say we tried! However, in this case it definitely worked out!


Snickerdoodle Truffles
adapted from Shugarysweets

Ingredients

Truffle Center:
4 oz cream cheese, softened
1/2 cup unsalted butter, softened
1/4 cup dark brown sugar
1/2 cup granualted sugar
1 1/4 cup gluten-free flour (I use Cup4Cup)*
1 teaspoon vanilla extract
1/4 teaspoon kosher salt
1 1/4 teaspoon ground cinnamon

Coating:
16 oz vanilla candy coating, divided
1/2 teaspoons ground cinnamon
1 tablespoon cinnamon/sugar mixture**

In a large mixing bowl, beat cream cheese and butter with both sugars until smooth and creamy. Mix in the flour, vanilla, salt and cinnamon until combined well. Scoop dough and roll into balls, about a tablespoons worth. (Since my sous chef is a 5 year old, our truffles were all different sizes and it didn't matter one bit!) Place your balls on a baking sheet lined with parchment paper. Freeze for 2 hours or overnight.

Melt vanilla candy coating. Set aside 1/4 cup of melted coating for later. To the remaining melted candy coating add 1/2 teaspoon of ground sugar. Using a toothpick, dip each of the frozen truffles into the melted candy coating. Carefully placed dipped truffle back on the parchment paper. Once all truffles have been dipped, drizzle the reserved melted candy coating over all of the truffles. Immediately sprinkle the truffles with the cinnamon/sugar mixture. Allow the truffles to set in the refrigerator, about ten minutes. Enjoy!!!***

*Since I used gluten-free flour I omitted the 1/4 teaspoon of cream of tartar. I would include it if I were to make these truffles with all-purpose flour.

**You can make a cinnamon/sugar mixture by taking equal parts granulated sugar and cinnamon then combine. My kiddos like to sprinkle this mixture on buttered toast as a special treat.

***I have been told these truffle will keep in your fridge for a week and a month in your freezer - but I would not know since these truffle were a huge hit!

Thursday, February 20, 2014

Simple Mussels

Last weekend I was shopping at Wegmans and I noticed that mussles were on sale. When we lived in Marblehead, MA one of our favorite dinners to share were PEI mussles but I had never prepared them at home before. So when the nice man in the fish department told me that it would be so easy with cook, I decideed to go for it. Boy am I glad I did! 


Classic French Mussels
adapted from Hank Shaw

2 pounds live mussels
1 tablespoon unsalted butter
1 shallot, chopped
2 cloves garlic
3/4 cup white wine

Scrub and debeard the mussels. The "beard" is the fibrous hairy thing hanging from one side of the tasty bivalve. Pull it off with a side-to-side motion. Luckily our mussels, from Wegamans, were already debearded.

Heat the butter over medium-high heat in a large, wide-bottomed pot with a lid; I used a large saute pan. Saute the shallot until it is soft but not browned. Then add the garlic cloves.

Add the white wine and bring it to a boil. Once sauce is boiling add the mussels. If possible, keep them in one layer.

Cover the pot and let the mussels steam for 3-8 minutes. After three minutes, check the mussels; many should be open. You want them all open, but some will do this faster than others.

As soon as most of the mussels are open, turn off the heat. Cover for a minute while you prepare bowls and plates.

Spoon out plenty of mussels and broth, which should be briny enough to not need any more salt. 

Throw out any mussels that did not open!
Serve with crusty bread for dipping. Enjoy!!!

Tuesday, February 11, 2014

Snickerdoodle Bread

You all know I love to bake right? Baking to me is so easy; look up a recipe, carefully read it over, make changes if needed and then go for it. After following those steps, twice, I have a "new to me" recipe to share with you. If you love cinnamon I have feeling you are going to be happy with this one! (Hubby's note- VERY VERY VERY HAPPY!)


Snickerdoodle Bread

Batter Ingredients
1 cup unsalted butter, softened
2 cups granulated sugar
3 eggs
2 teaspoons vanilla extract
1 cup sour cream
2-1/2 cups all purpose flour
2 teaspoons baking powder
1/2 teaspoon salt
2 teaspoons cinnamon
1 (10 oz) package cinnamon chips
1 tablespoon flour

Topping Ingredients
2 tablespoons granulated sugar
2 teaspoons cinnamon

Preheat oven to 350 degrees.

Prepare TWO 9-inch x 5-inch loaf pans by butter and lining with parchment paper. *This step is a must!*

In a large bowl, combine , butter and sugar; cream together for 2 minutes until fluffy. Add eggs one at a time, mixing well after each addition. Add vanilla and sour cream, mix to combine.

Combine flour, baking powder, salt, and cinnamon in a separate bowl. Add flour mixture to creamed mixture, stirring just until combine.

Coat the cinnamon chips with 1 tablespoon flour, then stir into the batter. Evenly spoon batter between your prepared pans.

Combine sugar and cinnamon for topping. Sprinkle topping over batter before baking. Bake in preheated oven for 60-70 minutes or until a toothpick inserted in center of loaf comes out clean.

Remove from oven and let cool for 15 minutes before removing bread from pan.

Enjoy!


One of the things that I love about this recipe is that you get two loafs of bread. Gift one to a friend and save one for your family. Winner-winner!

Tuesday, February 4, 2014

Winter S'mores

What did I get for blogging about Spring? A ice cold day filled with rain, sleet, snow and then some more freezing rain. To say that yesterday was a miserable day, weather-wise, would be an understatement! The worst part of it all was that we could not stay bundled up inside. L and I had to brave the bad weather in order to make it up to school for a PTO meeting. You should have seen the look on his face when I told him he had to get out of his pj's!


The poor boy had to sit through an hour and a half meeting. If the meeting seemed long to me, I could only image what L thought of it. Never the less, he was so well behaved! He quietly played with his army men and didn't really make a sound. So when we got home I decided to make him a little treat. Toaster oven s'mores!

Who needs a bond-fire when you have a toaster oven. Simply top one graham cracker square (you can use a gluten-free one if needed) with chocolate chips. Top the other graham cracker with a marshmallow. Then place both squares in the toaster oven and toast until the marshmallows start to turn golden brown. Carefully squish the two squares together and enjoy!


It doesn't get mush better than a warm chocolaty treat on a chilly day!

You can also find me at: Savvy Southern Style

Wednesday, January 29, 2014

Pork Chops With Sauce & Orzo

What is with the weather lately? When we moved down from the North Shore of Boston to NoVa I thought that I had said good-bye to below freezing days. Man was I wrong! It has been just too cold here and cold weather calls for comfort food if you ask me. So a couple of nights ago I got out my dutch oven and whipped up a hearty dinner to keep winter chills away!


Pork Chops with Sauce & Orzo

2 tablespoons extra virgin olive oil
4 pounds of boneless pork chops
1/2 kosher salt
1/2 fresh ground pepper
3 to 4 cloves of garlic, crushed
1/4 cup balsamic vinegar
1 (28 oz) can of crushed tomatoes

Season pork chops with salt and pepper on both sides. In a dutch oven, heat olive oil to medium heat. When the oil is hot add pork chops in a single layer and cook each side for 3 to 4 minutes, or until golden brown. Remove pork chops from the pan and set aside.

Add crushed garlic to pan and cook for about 2 minutes then add the balsamic vinegar. Bring garlic vinegar mixture to a boil then turn down heat and add the can of crushed tomatoes.

Place pork chops back in the pan with the sauce and simmer until pork chops are cook through and tender.

Serve pork chops and sauce over a bed of orzo*. Enjoy!!!

(Hubby's note- This was another winner. Definitely a great choice for a cold winter night.)

*DeLallo makes a super yummy gluten-free orzo*

You can also find me at: Savvy Southern Style

Tuesday, January 14, 2014

Tomato, Olives and Caper...Oh My!

Our Sunday dinner was just too good! It was one of those dinners that was not really planned, it just sort of came together. Plus it was as easy. Grilled swordfish with a tomato, olive and caper sauce. Hubby grilled the fish while I whipped up the sauce. Gotta love team work!


Tomato, Olive and Caper Sauce

1 teaspoon extra virgin olive oil
2 cloves garlic, chopped
1 pint cherry tomatoes, chopped
1/4 cup dry white wine
1/4 cup pitted katamala olives, chopped
2 tablespoons capers

In a medium sized sauce pan heat olive oil. Add garlic and saute for 2 minutes. Then add the chopped tomatoes and wine. Bring to a boil and then simmer for 5 minutes. Finally add the olives and capers to the tomato sauce and stir until all ingredients are heated.

We served this sauce over grilled swordfish but I think that the sauce would work well on any firm fish. It would also taste great with sauteed shrimp. Maybe even with just some pasta. Endless uses my friends! Enjoy!!!

Tuesday, January 7, 2014

Chops And Sauce

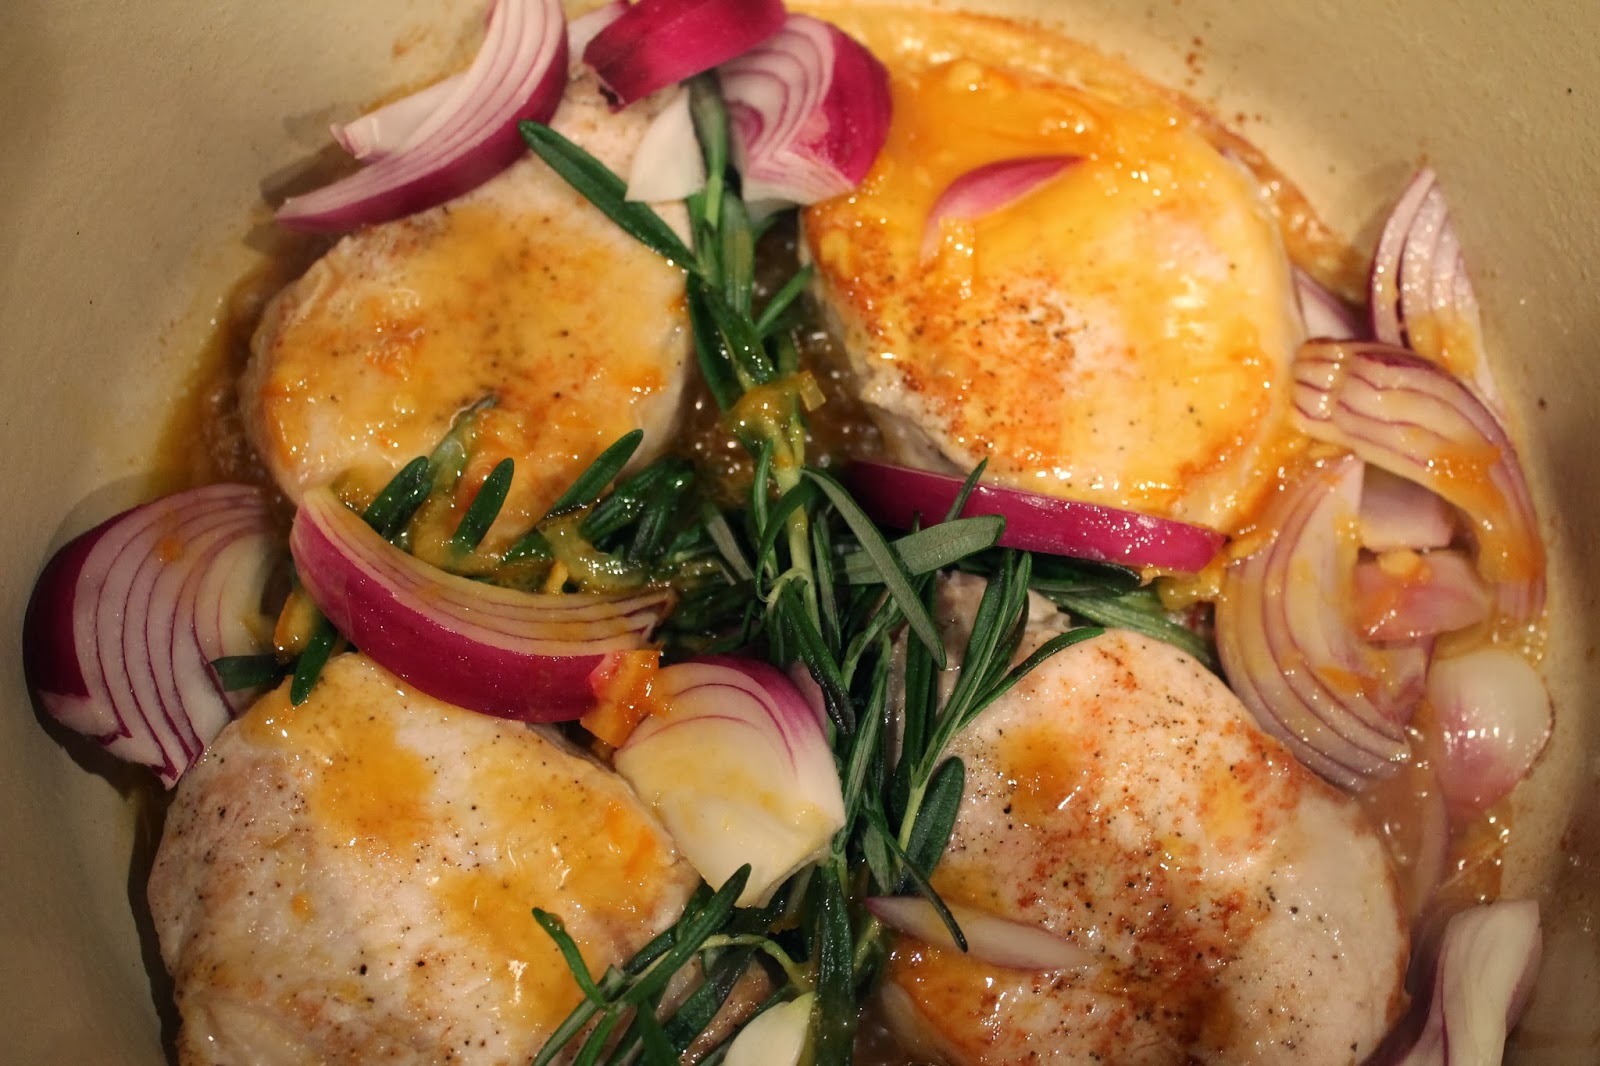
Once again the kids had off yesterday, not really sure why but they did. So after a nice relaxing morning at home, we ventured out to run some errands. Since I had some extra time this morning while I was making my grocery store list I poured over the latest from Cooking Light and found a recipe that looked very promising. If an unexpected snow-day is not the time to try a new recipe then I don't know what is!


On a cold and windy day, Orange-Mustard Glazed Pork Chops sounded just right! The recipe calls for enough citrus that I could pretend I was on the beach in Florida yet had enough sauce to be served with smashed red bliss potatoes. Honestly it was heavenly on such a cold night! (Hubby's note- Thumbs up for this recipe! It was really good.)


1/2 cup fresh orange juice
2 tablespoons orange marmalade
1 tablespoon whole-grain mustard (if you are gluten free read carefully since some whole-grain mustard contain gluten!)
1 tablespoon canola oil  *I used extra virgin olive oil. I always do!*
4 bone-in pork chops (1 inch thick) **I had to go boneless since the store was sold out of bone-in. Less cooking time but is was still yummy**
1/4 teaspoon kosher salt ***I might have added more salt***
1/4 teaspoon freshly ground pepper
2 fresh rosemary springs
1 medium red onion, cut into 1/2 inch wedges
2 tablespoons fresh lime juice

Preheat oven to 425 degrees.

In a small sauce pan, combine the orange juice, marmalade and mustard; stir over medium high heat. Bring to a boil, reduce heat and simmer until syrupy. About 10 minutes.

Heat a large ovenproof skillet oven medium-high heat. Add oil; swirl to coat. Salt and pepper pork and add to pan; cook until brown. Turn pork; add rosemary and onions to pan. Pour juice mixture over the pork; bake at 425 degrees for 10 minutes or until thermometer registers 140 degrees. 

Place onions and rosemary on a platter. 

Return pan to medium-high heat; add lime juice. Cook 4 minutes or until liquid is syrupy. 

Add pork to platter; drizzle with sauce. Serve hot!


I chose to serve my chops along side smashed red bliss potatoes and roasted asparagus. There is not a doubt in my mind that I will make this recipe again. And again!!!

Wednesday, November 13, 2013

Da Bomb!

I know that I have already told you all about one of Baltimore's sweet treats, Berger Cookies. While some might be happy to indulge in these awesome cookies as-is, every once in a while I like to step it up a notch and turn them into the Baltimore Bomb pie. The best way to describe it is a traditional chess pie with chopped up Berger cookies added. I know that sounds weird but trust me!


Baltimore Bomb

1 frozen extra deep Pillsbury pie crust
1 egg
4 egg yolks
2/3 cup granulated sugar
1/2 cup brown sugar
1/2 teaspoon kosher salt
2 tablespoons cider vinegar
2/3 cup heavy whipping cream
6 tablespoon unsalted butter, cut into small cubes
10 Berger cookies, chopped

Prepare pie crust according to the instructions on the bag. Allow crust to complete cool.

Preheat oven to 300 degrees. Bring about an 1 1/2 cups of water to simmer in a medium sauce pan

Whisk together the egg, egg yolks, sugars, salt and cider vinegar in a heat proof bowl.  Whisk the heavy cream and then place bowl over the simmering water. Add the butter and continue to whisk until the mixture is warm to the touch.

Place chopped Berger cookies into the baked pie crust. Gently pour mixture over the Berger cookies and place in oven. Bake for 1 to 1 1/2 hours or until pie has set.

Allow pie to cool for at least an hour before slicing. I know that it is really hard to wait that long but if you slice it while it is too hot the pie will just fall apart!

Enjoy!!!


M wanted me to let you know that the pie is best served with a cold glass of milk. And I would have to agree with him - yum!

Monday, October 14, 2013

Perfect Combo

Long weekends are the best. It is like you get two Saturdays! And last night my girlfriends and I made the most of our "bonus" Saturday night. Eight of us got together for an early dinner at a local wine-bar/restaurant, The Wine Kitchen.


The Wine Kitchen is a great place for sharing and trying new wines. They have put together tons of different wine flights from all over the world. They really have something for everyone. And I simply love the way they have little "note cards" for all of their wines. Each card gives you a little info about the wine you are enjoying along with a little humor. I love a wine-bar that does not make you feel ignorant for not being a sommelier! 


The food was also perfect for sharing too! We started off with a cheese flight and shared three of their farm-to-table entrees. A long weekend with wine, food and friends is a pretty great combo in my book! 

Tuesday, October 8, 2013

Rainy Day Baking

Yesterday morning was a wet one here in NoVa. At times it seemed as though the rain was coming down in sheets sideways. Don't get me wrong, I am not complaining! We really needed the rain. And it gave me an excuse to stay inside and nest a little bit.


Not sure about you but when I nest, I bake! On a cold rainy day baking is the way to go in my mind. Not only does it warm my kitchen up it also makes the whole house smell wonderful! I decided to whip up some Pumpkin Bread since I had not made it in forever. Easy and yummy!!!


Quick & Easy Pumpkin Bread

3 1/2 cups flour
3 cups white granulated sugar
2 teaspoons baking soda
1 1/2 teaspoons salt
1 1/2 teaspoons freshly granted nutmeg*
1 1/2 teaspoons cinnamon
1 can of 100% solid pack pumpkin (not pumpkin pie in a can)
1 cup vegetable oil
2/3 cup water
4 eggs

Preheat oven to 350. Grease and flour 2 large loaf pans. 

In a large mixing bowl add flour, sugar, baking soda, salt, nutmeg and cinnamon. Mix well to combine.

In a separate bowl, beat together the pumpkin, oil and water. Then add one egg at a time, beating the eggs well into the mixture.

Make a hole in the center of the dry ingredients and add the pumpkin mixture. Stir well to combine and get most of the lumps out.

Bake for 75 minutes or until a tooth-pick comes out clean after being inserted into the center of the bread. Cool completely before taking carefully taking pumpkin bread out of the pans.

Enjoy!


There are endless reasons why I love this recipe. It is like pumpkin pie just in bread form. My house still smells unreal hours and hours after baking it. I could go on and on but one of the best things about this simple recipe is that it makes two loafs. One for your family to enjoy and one to gift. 

Trust me this recipe will make you very popular!!!

Related Posts Plugin for WordPress, Blogger...
 
SITE DESIGN BY DESIGNER BLOGS