Showing posts with label gluten free. Show all posts

Wednesday, April 30, 2014

Spring Risotto

There is just something about ham that says "Spring" to me. Just thinking abut roasting a spiral ham makes me hungry but these days I just don't have time to spend a whole day in the kitchen. Three kiddos on four different sports team really has forced me to cook more quick meals. But quick does not have to mean tasteless food.

So if you and in the mood for a yummy ham dinner but have little time give this recipe a try. I promise you will love it!!!


Risotto with Peas and Prosciutto

1 tablespoon olive oil
1 small onion, chopped
1 cup Arborio rice (short gain)
4 to 6 cups hot chicken broth*
1 cup frozen or fresh green peas
1/2 cup roughly chopped prosciutto

Heat chicken broth to a gentle boil in a small pan. 

In another pan (medium sized) saute the chopped onion in olive oil over medium heat, until the onion is softened.

Add rice and saute for about 2 minutes until all the grains are coated.

Add hot broth, 1 cup at a time, stirring after each addition until the broth is adsorbed; about 20 to 25 minutes. The risotto should be creamy; add more liquid if a creamier texture is desired.

Stir in the peas and prosciutto until the peas are heated all the way. Serve immediately and enjoy!

*If you or someone you are cooking for is on a gluten-free diet be careful which chicken broth you use. I know that it is hard to believe but some chicken broths have gluten added to them. Weird, right!?!*

Tuesday, April 8, 2014

Peppered Steaks

Hubby says many sweet and kind things to me. One of the sweetest things that he says to me from time to time is, "I feel like cooking dinner tonight." I mean really what wife would not love to hear that!?! Recently, Hubby said just that and then hopped online to find a different way to prepare steak other than grilling. His finding were so good that I just had to share them with you!


Pepper Crusted Steak
4 Sirloin steaksKosher salt3 Tablespoons freshly ground black pepper, coarseOlive oil, enough to coat the bottom of your cast-iron skillet
Pre-heat the oven to 500°F. 
Sprinkle the steaks with salt on both sides, and then press the ground peppercorns into the steaks on both sides. 
Set a large cast-iron skillet over medium-high heat and add just enough olive oil to make a light film. When the oil is very hot, add the steaks, cooking until nicely browned on one side, about 3 minutes. Flip the meat over and put the skillet in the oven. 
For medium-rare steaks, roast for 3 minutes for 6-oz. steaks; 4 minutes for 8-oz. steaks*. Check for doneness with the tip of a knife or by pressing with your fingertips, keeping in mind that the steaks will cook a bit more as they sit**. Transfer the steaks to a warm plate and tent with foil.
*Hubby left the steaks in the oven for about 5 minutes. 
**Hubby used a meat thermometer to make sure that the steak had reached 145 degrees. (Hubby's note- I was pretty happy with the results overall since I have never made steak any way other than on the grill before. I will especially keep this in mind next winter when it is too cold outside to grill.)

The pepper added a bit of kick but nothing too bad, unless you are B who I think would complain about milk being spicy. Add some rice and a salad (and maybe a gin and tonic) to round out this great dinner. Definitely something to keep in mind next time we have company!

Wednesday, April 2, 2014

Unicorn Salt

I love green beans! I could eat them every night of the week. You can steam them, add them to a casserole or even eat them raw with a yummy dip. The possibilities are endless if you ask me. Alas, the four other members of my family do not feel the same way. No matter how I served them no one enjoyed them.


All of that changed when B and I stumbled upon a salt tasting at a local gourmet shop. I for one had never heard of a salt tasting but since I am a "salty over sweet" kind of a gal I was all for it. B and I both enjoyed some of the flavored salts from a company called Beautiful Briny Sea. B decided that we had to buy their Magic Unicorn Salt. 


The salt has a great smoky flavor. Since Beautiful Briny Sea stated that one should use it on anything because "it's magic" I thought I would try in on green beans. I simply added some of the salt to some green beans that I had sauteed.


And what do you know....they all loved the green beans! Truly it was a veggie miracle!!!

Thursday, February 27, 2014

Snickerdoodle Candy

I am not sure if it is all the cold this weather or what but we have really been on a "snickerdoodle" kick lately. First we made snickerdoodle bread and this week we tried a snickerdoodle candy recipe. L had wanted to try snickerdoodle cookies but all of the recipes that I found called for eggs and L is allergic. And when I googled egg-free snickerdoodles I came upon a candy recipe. 


All I could think while L and I were making the truffles together was that even if the recipe was a bust the look on his face was so worth the effort. Sometimes I think B & L just like it when I try to make something they have seen their friends eat but they can't due to food issues. Even if our attempt does not work, at least we can say we tried! However, in this case it definitely worked out!


Snickerdoodle Truffles
adapted from Shugarysweets

Ingredients

Truffle Center:
4 oz cream cheese, softened
1/2 cup unsalted butter, softened
1/4 cup dark brown sugar
1/2 cup granualted sugar
1 1/4 cup gluten-free flour (I use Cup4Cup)*
1 teaspoon vanilla extract
1/4 teaspoon kosher salt
1 1/4 teaspoon ground cinnamon

Coating:
16 oz vanilla candy coating, divided
1/2 teaspoons ground cinnamon
1 tablespoon cinnamon/sugar mixture**

In a large mixing bowl, beat cream cheese and butter with both sugars until smooth and creamy. Mix in the flour, vanilla, salt and cinnamon until combined well. Scoop dough and roll into balls, about a tablespoons worth. (Since my sous chef is a 5 year old, our truffles were all different sizes and it didn't matter one bit!) Place your balls on a baking sheet lined with parchment paper. Freeze for 2 hours or overnight.

Melt vanilla candy coating. Set aside 1/4 cup of melted coating for later. To the remaining melted candy coating add 1/2 teaspoon of ground sugar. Using a toothpick, dip each of the frozen truffles into the melted candy coating. Carefully placed dipped truffle back on the parchment paper. Once all truffles have been dipped, drizzle the reserved melted candy coating over all of the truffles. Immediately sprinkle the truffles with the cinnamon/sugar mixture. Allow the truffles to set in the refrigerator, about ten minutes. Enjoy!!!***

*Since I used gluten-free flour I omitted the 1/4 teaspoon of cream of tartar. I would include it if I were to make these truffles with all-purpose flour.

**You can make a cinnamon/sugar mixture by taking equal parts granulated sugar and cinnamon then combine. My kiddos like to sprinkle this mixture on buttered toast as a special treat.

***I have been told these truffle will keep in your fridge for a week and a month in your freezer - but I would not know since these truffle were a huge hit!

Tuesday, February 4, 2014

Winter S'mores

What did I get for blogging about Spring? A ice cold day filled with rain, sleet, snow and then some more freezing rain. To say that yesterday was a miserable day, weather-wise, would be an understatement! The worst part of it all was that we could not stay bundled up inside. L and I had to brave the bad weather in order to make it up to school for a PTO meeting. You should have seen the look on his face when I told him he had to get out of his pj's!


The poor boy had to sit through an hour and a half meeting. If the meeting seemed long to me, I could only image what L thought of it. Never the less, he was so well behaved! He quietly played with his army men and didn't really make a sound. So when we got home I decided to make him a little treat. Toaster oven s'mores!

Who needs a bond-fire when you have a toaster oven. Simply top one graham cracker square (you can use a gluten-free one if needed) with chocolate chips. Top the other graham cracker with a marshmallow. Then place both squares in the toaster oven and toast until the marshmallows start to turn golden brown. Carefully squish the two squares together and enjoy!


It doesn't get mush better than a warm chocolaty treat on a chilly day!

You can also find me at: Savvy Southern Style

Wednesday, January 29, 2014

Pork Chops With Sauce & Orzo

What is with the weather lately? When we moved down from the North Shore of Boston to NoVa I thought that I had said good-bye to below freezing days. Man was I wrong! It has been just too cold here and cold weather calls for comfort food if you ask me. So a couple of nights ago I got out my dutch oven and whipped up a hearty dinner to keep winter chills away!


Pork Chops with Sauce & Orzo

2 tablespoons extra virgin olive oil
4 pounds of boneless pork chops
1/2 kosher salt
1/2 fresh ground pepper
3 to 4 cloves of garlic, crushed
1/4 cup balsamic vinegar
1 (28 oz) can of crushed tomatoes

Season pork chops with salt and pepper on both sides. In a dutch oven, heat olive oil to medium heat. When the oil is hot add pork chops in a single layer and cook each side for 3 to 4 minutes, or until golden brown. Remove pork chops from the pan and set aside.

Add crushed garlic to pan and cook for about 2 minutes then add the balsamic vinegar. Bring garlic vinegar mixture to a boil then turn down heat and add the can of crushed tomatoes.

Place pork chops back in the pan with the sauce and simmer until pork chops are cook through and tender.

Serve pork chops and sauce over a bed of orzo*. Enjoy!!!

(Hubby's note- This was another winner. Definitely a great choice for a cold winter night.)

*DeLallo makes a super yummy gluten-free orzo*

You can also find me at: Savvy Southern Style

Tuesday, January 7, 2014

Chops And Sauce

Once again the kids had off yesterday, not really sure why but they did. So after a nice relaxing morning at home, we ventured out to run some errands. Since I had some extra time this morning while I was making my grocery store list I poured over the latest from Cooking Light and found a recipe that looked very promising. If an unexpected snow-day is not the time to try a new recipe then I don't know what is!


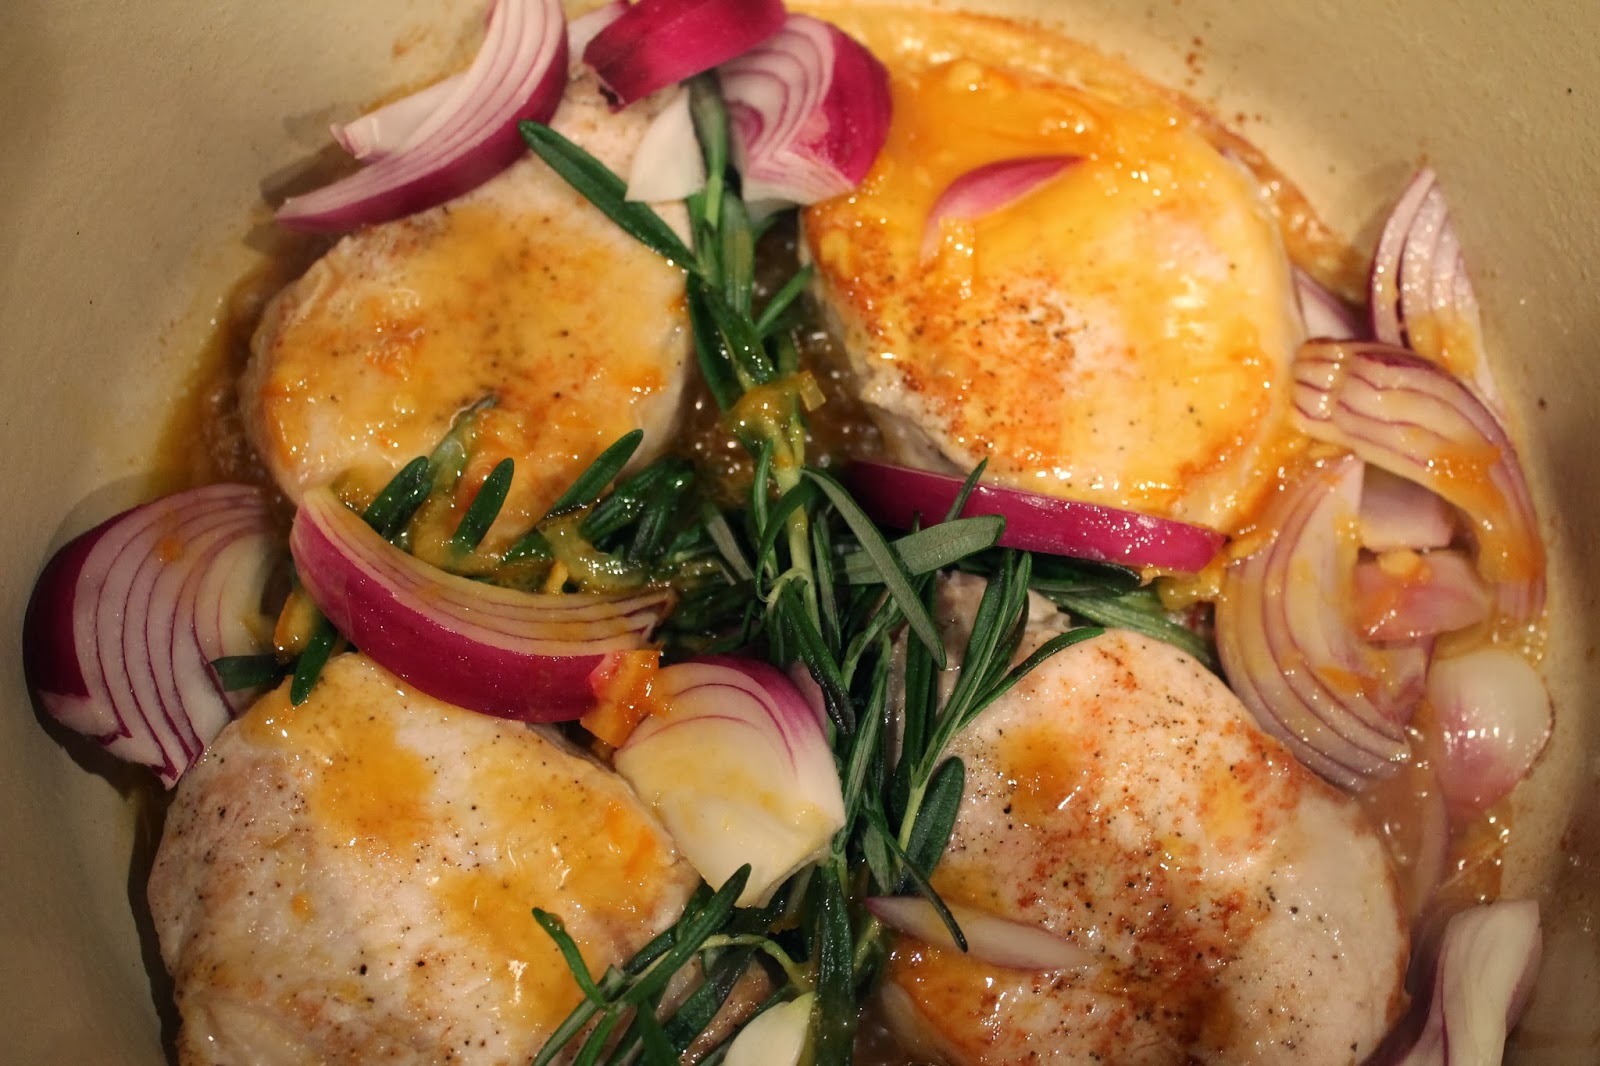
On a cold and windy day, Orange-Mustard Glazed Pork Chops sounded just right! The recipe calls for enough citrus that I could pretend I was on the beach in Florida yet had enough sauce to be served with smashed red bliss potatoes. Honestly it was heavenly on such a cold night! (Hubby's note- Thumbs up for this recipe! It was really good.)


1/2 cup fresh orange juice
2 tablespoons orange marmalade
1 tablespoon whole-grain mustard (if you are gluten free read carefully since some whole-grain mustard contain gluten!)
1 tablespoon canola oil  *I used extra virgin olive oil. I always do!*
4 bone-in pork chops (1 inch thick) **I had to go boneless since the store was sold out of bone-in. Less cooking time but is was still yummy**
1/4 teaspoon kosher salt ***I might have added more salt***
1/4 teaspoon freshly ground pepper
2 fresh rosemary springs
1 medium red onion, cut into 1/2 inch wedges
2 tablespoons fresh lime juice

Preheat oven to 425 degrees.

In a small sauce pan, combine the orange juice, marmalade and mustard; stir over medium high heat. Bring to a boil, reduce heat and simmer until syrupy. About 10 minutes.

Heat a large ovenproof skillet oven medium-high heat. Add oil; swirl to coat. Salt and pepper pork and add to pan; cook until brown. Turn pork; add rosemary and onions to pan. Pour juice mixture over the pork; bake at 425 degrees for 10 minutes or until thermometer registers 140 degrees. 

Place onions and rosemary on a platter. 

Return pan to medium-high heat; add lime juice. Cook 4 minutes or until liquid is syrupy. 

Add pork to platter; drizzle with sauce. Serve hot!


I chose to serve my chops along side smashed red bliss potatoes and roasted asparagus. There is not a doubt in my mind that I will make this recipe again. And again!!!

Thursday, December 12, 2013

Gingerbread Men: Girls vs Boys

We had a couple pf friends over to play this week and I thought all of the kiddos might like to decorate some ginger bread cookies. I made the dough ahead of time and rolled it out. All I needed was for my little helpers to get off the bus and help me finish making the cookies.


Everyone had a great time picking out what cookie cutters they wanted to use. Some stars, bells and snowflakes were made. But for the most part the boys just wanted to make gingerbread men and from there on in my sweet project to an unplanned turn....


Edible dragees became "helmets". Red "eyed" gingerbread men were now zombies. And all dough scraps quickly became bows and arrows. While this should have come as no surprise to me since I have three younger brothers, but really!?!


Thank goodness B kept her cookies all sweet and girly!!! 

Thursday, December 5, 2013

Chocolate Mint Cookies

I have been in the mood to bake some treat for the kiddos' teachers but I wanted to try something new. So of course I turned to Pinterest for a little inspiration. On the main page there were a couple of mint brownies trending that looked super yummy but when I went to their original source the recipes were very involved.

You all know that I love to bake but I was not not up for a challenging recipe. I need something that I could whip up while making dinner and overseeing homework. Is it just me or do you not remember having homework as hard as your child does now? Anyway...I decided to make some cookies with a mint twist. Since most of the brownie recipes were inspired by Andes mints I thought why not just add them to cookies!


Chocolate Mint Cookies

3 sticks unsalted butter, soften
1 1/4 cups granulated sugar
1 1/4 cups dark brown sugar
2 extra large eggs
1 1/2 tablespoons vanilla
1/2 teaspoon kosher salt
2 teaspoons baking soda
1 cup cocoa powder
3 cups unbleached flour or gluten-free flour (such as Cup 4 Cup)
2 packages (4.67 ounces) Andes Creme De Menthe Thins, roughly chopped
1 cup dark chocolate chips

Preheat oven to 350 degrees

In a large bowl cream together the butter and sugars. Then add one egg at a time and mix until light and fluffy. Gently mix in the vanilla, salt, baking soda and cocoa powder. Once combined well stir in the flour. Then fold in the chopped mints and chocolate chips.

Using an ice cream scoop, scoop cookie dough and place on to a cookie sheet lined with parchment paper. Bake for 16 to 18 minutes - you might need more or less time depending on your oven. Either way the center of your cookies should look slightly underdone. This way you will have a perfect cookie once they cool.

Enjoy!


(Hubby's note- This new recipe is strongly endorsed by both myself and M. We may or may not have gone to town on the raw dough but the baked version is just as good. Give it a try, you won't be disappointed!)

You can also find me at From My Front Porch and No Minimalist Here

Thursday, October 31, 2013

Allergy Safe Halloween

Happy Halloween!!! My kiddos are so excited about today and the massive sugar coma they hope to be in by later tonight. I on the other hand don't really love Halloween. When you have children with food allergies holidays that revolve around candy can cause some anxiety. 


Luckily the Tootsie Company is looking out for those that cannot have peanuts, tree nuts and/or gluten. For a family that has one child who is allergic to peanuts and tree nuts and other who has Celiac Disease Tootsie's clearly marked packages are a huge help.


Yesterday I got all of our candy ready to hand out and I also put aside some candy for B and L. When they get home later tonight I will let them "trade" unsafe pieces of candy for safe pieces. Then we will let the sugar rush begin....well for one night!

Wednesday, August 28, 2013

It's All In The Rub

I hope that you will forgive me. I promised to share with you the dry rub recipe that I used for my barbecue ribs and I totally spaced. I am so sorry! I hope that you find it to be worth the wait since I really think that this spice rub would work well for so much more than ribs!


Dry Rub (adapted from Southern Living 2009)

Ingredients :
  • 8 teaspoons seasoned salt
  • 4 teaspoons dark brown sugar 
  • 3 teaspoons granulated sugar 
  • 3 teaspoons paprika
  • 1/2 teaspoon garlic powder
  • 1/2 teaspoon pepper
  • 1/4 teaspoon dry mustard
  • 1/4 teaspoon ground cumin
  • a pinch of ground ginger
Directions:
  • Stir together all ingredients. Store in an airtight container up to 1 month.
This recipe will yield you about 4 tablespoons of dry rub which I personally feel is more than enough for two racks of ribs. When I made the ribs the first time, I followed the recipe which had me use 2 tablespoons of rub twice per rack. Next time I will only use the rub once. While I loved the overall favor I thought seasoning the ribs once would be more than enough. But stay tuned and I promise to keep you updated....

Thursday, July 25, 2013

Chocolate Can Fix Anything

L's stitches were supposed to dissolve on their own in a week.  Unfortunately they did not and they were starting to cause him some discomfort so I made an appointment to have them cut out yesterday. You can imagine how excited L was to have a doctor come at him again with a sharp object.  Poor boy was not happy at all!!!

So I hope that you will not think less of me but I promised to make him a sweet treat if he would just try and be brave.  He did try but his hair was caught in the stitches which caused him a bit of pain.  By the time all of his stitches were out I was in need of a treat just as much as L was!!!


Chocolate Whipped Cream

1 cup heavy whipping cream, very cold
1/4 cup powdered sugar
2 tablespoon cocoa powder 

1 metal bowl, place in freezer one hour before

In a small bowl combine the powdered sugar and cocoa.  Mix well with a folk.  

Pour cream into metal bowl.  With an electric mixer whip cream until very soft peaks start to form. Then add the sugar and cocoa mixture, one tablespoon at a time.  (You might not be able to add all of the mixture depending on the humidity.  It was hot and humid in NoVa yesterday so we only added three tablespoons.)  Keep whipping until firm peaks form.  Enjoy!


L gave the recipe the thumbs up.  I am happy to report that he is healing well and finally got the green light to swim again.  I am not sure who was more over joyed to get that news.  I already have the pool bag packed and ready to go!

Wednesday, July 24, 2013

Grilled Pork Chops

I am a very lucky gal for many reasons and I count my blessings everyday.  One thing that I am very grateful for is that my parents and in-laws get along and enjoy each other's company.  Whenever my parents come for a visit I make a point to invite my in-laws over to join all of us for dinner.  So of course we had them over for dinner this past week while my mom is here for our "week of projects".

Hubby was sweet enough to grill pork for the whole gang.  Everyone, adults and kiddos loved it so I thought I would share the recipe with you...


Peach-Mustard Pork Chops

Peach- Mustard BBQ Sauce

6 tablespoons unsalted butter
1/4 cup minced onion
4 cloves garlic, minced
3/4 cup apple cider vinegar
1 cup whole-grain mustard
1/2 Dijon mustard
1 1/2 cup peach preserves
3 tablespoons bourbon (Hubby's note- And a shot for the chef)
1 teaspoon kosher salt

Melt the butter in a sauce over medium heat.  Add the onions and garlic then cook until translucent, about 3 to 5 minutes.  Add the vinegar and boil until almost completely reduced, about 4 minutes. Whisk in both mustards and preserves.  Simmer while whisking until the preserves melt completely. Remove pan from the heat and stir in the bourbon and kosher salt.

Pork Chops

8 to 9 pork chops, thick cut
Olive oil, for brushing
Kosher salt 
Fresh ground pepper

Prepare ourdoor grill with a high heat for both direct and indirect grilling.  Position a drip pan under the grate on the cooler side of the grill.

Brush the pork chops on both sides with olive oil.  Season both sides with salt and pepper.  Let rest for 15 minutes.

Grill chops over heat until brown on both sides, about 4 minutes per side.  Move the chops to the cool side of the grill and brush them with some of the Peach-Mustard BBQ Sauce.  Continue to chop the chops, covered, turning and basting with the sauce every 5 minutes, until your thermometer registers 145 degrees F.  Let the chops rest for 10 minutes before serving. Enjoy!!!


Totally unrelated to pork chops, I am not sure if this happens when your parents and in-laws get together but when mine do all they talk about is how awesome it is to be a grandparent.  They go on and on about that fact.  To the point that I fear my parents would have skipped over raising their kids and gone right to the grandkids!!!

Thursday, May 16, 2013

Re-Invented Leftovers

My children are not the biggest fans of leftovers.  B does not like things to be reheated.  M will not eat anything unless it is the same temperature as it was the first night it was served.  And L is hit or miss most nights of the week. I guess they come by this honestly since my father will not eat leftovers.

However whenever we have a "taco-night" they hope we have enough leftovers for nachos.  I also get excited since it means that I have an easy (and somewhat healthy) dinner at the ready.  And last night I was over the moon that I could make the kids nachos since we had a jam-packed day!!!


Left-over Nachos

Taco Meat (we always use ground turkey)
Black beans
Sweet corn
Salsa
Shredded cheese (whatever kind you like)
Corn chips (we use Tostitos Scoops since they hold the toppings so well)

1. This is a recipe all about "eye-balling"!  First you must find the right baking dish. You want to make sure the dish to not be too big since you want an even layer of fixings.  Small amount of leftovers equals a small baking dish.  Big amount of leftovers equals a big baking dish.  Same goes for the cheese.

2. Combine taco meat, black beans, corn, and salsa in a pan and simply reheat.

3. Form a nice even layer of corn chips in your baking dish.  Evenly sprinkle half of your cheese over the chips.

4. Place baking dish under the boiler until cheese has melted.

5. Evenly spread the combined taco meat, beans, corn and salsa over the chips and cheese.  Sprinkle the remaining cheese on top.

6. Place baking dish back under the boiler until all the cheese is melted.

Enjoy!!!


Do you have any tip for "re-inventing" leftovers? 

You can also find me at Savvy Southern Style

Tuesday, April 9, 2013

Gluten Free Success!

Over the years I have been able to tweak many recipes so that B and L can enjoy the same kinds of foods that the rest of us eat.  That said, gluten and egg-free sugar cookies have been a problem no matter what I tried.  I would roll out the dough and it would look great but the cookies always seemed to "melt" and never hold their shape.  But thanks to a good family friend I tried a different gluten-free flour, Cup4Cup!  Cup4Cup gluten-free flour can be used just like regular wheat flour in any recipe and the best part is that you do not have to "tweak" the recipe.  While this sounded too good to be true I bought one bag and started baking.  What can I say, I am forever an optimist!


I turned to Ina Garten's shortbread cookie recipe since I always get perfectly shaped cookies when I bake them with regular flour.  (The only differences that I made was that I used Cup4Cup and did not dip the cookies in melted chocolate.)  The Cup4Cup blended in the dough just like regular flour.  I was a little nervous after the dough had chilled since it was crumbled very easily at first but after the dough warmed up it was not a problem to work with.  


I am happy to report that I was nervous for no reason at all!  The cookies baked up wonderfully and held their crisp edges.  As for taste, I would say that you would be hard pressed to tell that they were gluten and egg free cookies.  I can not tell you how excited I am by the baking success!!!

Thursday, March 21, 2013

S'mores Bars

This week my in-laws came over for dinner - they were in need of a "grandbaby fix".  (I have been told that being a grandparent is the best.)  Since I knew that we would be getting take-out for dinner I felt that dessert should be homemade.  I decided to go with Ex-Blogger A's recipe for S'mores Bars.  I have made this recipe both the original way and gluten free.  Either way it is a easy yet super awesome dessert!


S'mores Bars

1/2 cup butter (one whole stick)
1 1/2 cups graham cracker crumbs ***if you are making this with gluten free graham crackers I feel like you will need 2 cups.***
1 cup semi-sweet chocolate chips (L and I were in a chocolate kind of a mood today, so we used 1 1/2 cups)
1 can (14 oz.) sweetened condensed milk
1 1/2 cups miniature marshmallows

Preheat oven to 350 degrees.  While oven is preheating, cut butter into chunks and place them in 9x13" baking pan.  Place pan into oven until butter is melted.

Once butter is melted, take pan out of oven and sprinkle graham cracker crumbs evenly over the melted butter. Evenly sprinkle chocolate chips over crumbs.  Then evenly pour sweetened condensed milk over the chips and crumbs.  And place in the oven for 20 to 25 minutes.  (The condensed milk will get all bubbly on the sides of the pan but have no fear.)


Remove pan from oven and evenly sprinkle marshmallows   Return to oven for 2-5 more minutes.  ***At this point I turn my broiler on and carefully let the marshmallows brown.  But that is just our personal preference***

Allow bars to completely cool before you cut them with a sharp knife.  (I know that is a hard step but they will not cut right unless the bars are totally cooled.)  Then enjoy the gooey chocolaty,  marshmellow-y, carmel-y goodness!


Wednesday, March 20, 2013

B Made It!

Yesterday day was a very big day for B.  Not only was it was it the school science fair but she was also expecting big news.  For the past two weekends B has been playing her heart out in the hopes of making her field hockey club's travel team.

I have to be honest and let you know that I had mixed emotions about my ten year old trying out for a travel team.  On one hand I would love for B to play with girls that care as much about field hockey as she does but on the other hand she is only ten!  I fear that my children will not be able to be kids for as long as I was able to and that is heartbreaking.  But after much discussion with B and Hubby we decided to let her try out.  And man did she give it her all!!!


After the last evaluation on Sunday the coaches told the girls that they would hear on Tuesday whether they made the team or not.  Well I am happy to let y'all know that B made the team!  And she is just giddy!!!


Since the "big news" came on a Tuesday and we had to have a quick dinner due to the science fair, I decided to make on of B's most favorite sandwiches: bacon, lettuce and advocado on gluten free bread.  B calls them "BLA" (pronounced "blah") sandwiches which always gets a laugh from her brothers.

Nothing wrong with celebrating with a little bacon in my book!

Tuesday, March 12, 2013

Corned Beef and Cabbage

I know that it is not for everyone but I simply love corned beef and cabbage.  Growing up I was sad that my birthday was in the summer and not in March.  I would have loved to have corned beef for my birthday dinner year after year after year.  Oh well!

This past Saturday I knew that we would be home for most of the day so I decided to make corned beef but no cabbage.  I am the only one out of the five of us that enjoyed cooked cabbage so instead of wasting a whole head of cabbage I have been using brussels sprouts instead.  I find that they make a good substitute and I can cook just enough for me.


Corned Beef and Cabbage (Adopted from Betty Crocker Cookbook)

2 1/2 to 3 lbs trimmed corned beef brisket, undrained
2 to 4 cloves of garlic
1 teaspoon whole peppercorns
spice pack from the package of corned-beef
baby carrots
red bliss potatoes
head of cabbage or brussels sprouts (optional)

Place beef in a large covered pot; add juices and spices from the package of corned-beef.  Add enough cold water to cover the beef then add peppercorns and garlic.

Heat to a boil then reduce the heat to low.  Cover and simmer 3 hours or until the beef is tender.

Remove beef and cover with tin foil.  Skim the fat from the broth.  Add potatoes and carrots to broth.  Cover and cook for 20 minutes.  Add cabbage (or sprouts) to the broth.  Cover and cook until all the vegetables are tender.

Erin Go Bragh!

You can also find me at The Girl In The Red Shoes

Thursday, February 28, 2013

Gluten Free Baking

We have not done any baking this week due to a horrid stomach bug.  The kiddos are on a Gatorade and popsicle diet and I am washing towels and sheets way more than I had planned to this week. Yet the blog must go on so I thought I would talk about how I bake gluten free for B since some of you have asked.

When we first found out B needed a gluten free diet due to Celiac Disease we already knew that she was allergic to milk and eggs.  Trying to bake without butter, eggs and gluten was unreal!  Everything that I tried to make just did not work so I turned to mixes.  

Gluten free Brownies

I have been very happy with Cherrybrook Kitchen.  We have made their gluten free brownies, chocolate cake, chocolate chip cookies as well as their sugar cookies.  While we have been happy with the end product there is no doubt that it is gluten free and egg free.  Cherrybrook Kitchen's mixes produce a good but crumbly product since there is no "glue" but I will take crumbs over a trip to the ER any day of the week!


Xanthan Gum
GF All Purpose Baking Flour

In 2008 B outgrew her diary allergy and then in 2010 she outgrew her egg allergy.  I can not tell you how overjoyed we were even though I don't think she will ever sit down and eat an egg.  But at least I could start baking with eggs again and I personally feel like that really helps if you are using gluten free flour.

I have found that you can follow most baking recipes by replacing regular flour with gluten free flour.  The only catch is that you have to also add xanthan gum.  I have found that for every one cup of gluten free flour a recipe calls for I have to use 3/4 teaspoon xanthan gum.  This is the same "formula" I used when making my banana bread recipe gluten free as well as the chocolate chip cookie dough truffle recipe.  The only recipe that I have not been able to "tweak" is rolled sugar cookies.

Cup4Cup Gluten-Free Flour
I know that it is silly but it saddens me that I have not be able to make B a cute shaped cookie.  But I am hoping that that will change!  Over Christmas a wonderful family friend told me all about Cup 4 Cup gluten free flour and how she baked with it and no one knew it was gluten free.  I ordered some last night so look for a review soon friends...


Wednesday, February 13, 2013

Me and B

We are so lucky that our town has a Farmers Market every Saturday. May through October it is outside which adds to its charm. However this past Saturday when it was cold and windy I was so grateful that the Market had moved indoors to one of the town's antique shops for the winter!


After B and I picked up a tin of her beloved gluten-free brownies, (Hubby's note- which are RIDICULOUSLY good!) we had fun looking around the shop. I made poor B look at more blue and white china than she might have liked! I have hopes of passes this love on to her so I was so please when she pointed a "kiddie plate" of Blue Willow. (Any plate with divided sections is a "kiddie plate" in her mind.)


The shop also has some handmade jewelry for sale. B spied this soda tab and ribbon bracelet and was fascinated with it! I thought for sure she was going to ask to buy it. Instead she asked me to take a ton of pictures of the bracelet from all angles.  My little DIY'er is going to try and make it on her own. B will be sure to tell you all about real soon....


After running a bunch of errands in town I rewarded B with a sweet treat. A gluten-free "Shirley Temple" cupcake.  Yum!

Related Posts Plugin for WordPress, Blogger...
 
SITE DESIGN BY DESIGNER BLOGS